How to Build a Blog with Next.js, TailwindCSS, and Sanity CMS
Sunday, Dec 22, 2024
Building a modern blog is no longer as complicated as it used to be. With the combination of Next.js, TailwindCSS, and Sanity CMS, you can create a fast, SEO-friendly, and easy-to-manage blog. In this tutorial, I’ll guide you step-by-step from zero to deployment.
What Will We Build?
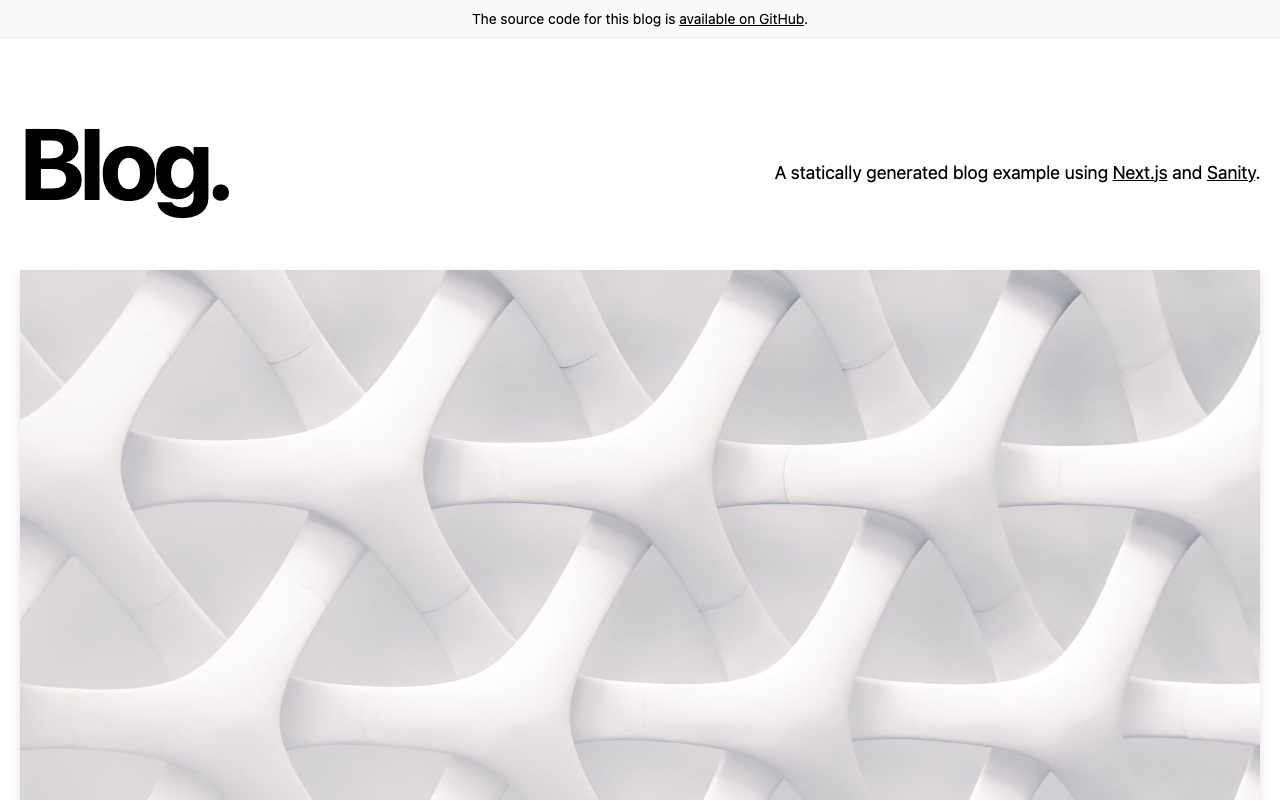
We’ll create a blog with these features:
- Homepage with article list
- Article detail page with content from Sanity
- Modern styling with TailwindCSS
- CMS dashboard for content management
Prerequisites
- Node.js version 18 or later
- Text editor (VS Code recommended)
- Sanity account (free)
- Basic knowledge of React and JavaScript
Step 1: Setup Next.js Project
Open your terminal and run the following command to create a new Next.js project:
npx create-next-app@latest my-blog
cd my-blog
When prompted, select these options:
- TypeScript: Yes
- ESLint: Yes
- Tailwind CSS: Yes
- src/ directory: Yes
- App Router: Yes
Step 2: Setup Sanity CMS
Install Sanity CLI and create a Sanity project inside the Next.js folder:
npm create sanity@latest -- --template clean --create-project "My Blog" --dataset production --output-path sanity
This will create a sanity folder inside your project with Sanity Studio.
Step 3: Create Schema for Blog Post
Create a schema file for blog posts at sanity/schemaTypes/post.ts:
import { defineField, defineType } from 'sanity'

export default defineType({
  name: 'post',
  title: 'Post',
  type: 'document',
  fields: [
    defineField({
      name: 'title',
      title: 'Title',
      type: 'string',
      validation: (Rule) => Rule.required(),
    }),
    defineField({
      name: 'slug',
      title: 'Slug',
      type: 'slug',
      options: {
        source: 'title',
        maxLength: 96,
      },
      validation: (Rule) => Rule.required(),
    }),
    defineField({
      name: 'excerpt',
      title: 'Excerpt',
      type: 'text',
      rows: 3,
    }),
    defineField({
      name: 'mainImage',
      title: 'Main image',
      type: 'image',
      options: {
        hotspot: true,
      },
    }),
    defineField({
      name: 'publishedAt',
      title: 'Published at',
      type: 'datetime',
    }),
    defineField({
      name: 'body',
      title: 'Body',
      type: 'array',
      of: [
        { type: 'block' },
        { type: 'image' },
      ],
    }),
  ],
})
Then register the schema in sanity/schemaTypes/index.ts:
import post from './post'

export const schemaTypes = [post]
Step 4: Run Sanity Studio
Navigate to the sanity folder and run the studio:
cd sanity
npm run dev
Open http://localhost:3333 and create some posts for testing.
Step 5: Install Sanity Client in Next.js
Go back to the project root and install dependencies:
cd ..
npm install @sanity/client @sanity/image-url @portabletext/react
Create file src/lib/sanity.ts for client configuration:
import { createClient } from '@sanity/client'
import imageUrlBuilder from '@sanity/image-url'

export const client = createClient({
  projectId: process.env.NEXT_PUBLIC_SANITY_PROJECT_ID!,
  dataset: 'production',
  useCdn: true,
  apiVersion: '2024-01-01',
})

const builder = imageUrlBuilder(client)

export function urlFor(source: any) {
  return builder.image(source)
}
Add environment variable in .env.local:
NEXT_PUBLIC_SANITY_PROJECT_ID=your_project_idStep 6: Create Blog List Page
Edit src/app/page.tsx to display the blog list:
import { client, urlFor } from '@/lib/sanity'
import Link from 'next/link'
import Image from 'next/image'

async function getPosts() {
  const query = `*[_type == "post"] | order(publishedAt desc) {
    _id,
    title,
    slug,
    excerpt,
    mainImage,
    publishedAt
  }`
  return client.fetch(query)
}

export default async function Home() {
  const posts = await getPosts()

  return (
    <main className="max-w-4xl mx-auto px-4 py-12">
      <h1 className="text-4xl font-bold mb-8">My Blog</h1>
      <div className="grid gap-8">
        {posts.map((post: any) => (
          <Link
            key={post._id}
            href={`/blog/${post.slug.current}`}
            className="group"
          >
            <article className="border rounded-lg overflow-hidden hover:shadow-lg transition">
              {post.mainImage && (
                <Image
                  src={urlFor(post.mainImage).width(800).height(400).url()}
                  alt={post.title}
                  width={800}
                  height={400}
                  className="w-full h-48 object-cover"
                />
              )}
              <div className="p-6">
                <h2 className="text-2xl font-semibold group-hover:text-blue-600">
                  {post.title}
                </h2>
                <p className="text-gray-600 mt-2">{post.excerpt}</p>
              </div>
            </article>
          </Link>
        ))}
      </div>
    </main>
  )
}
Step 7: Create Post Detail Page
Create file src/app/blog/[slug]/page.tsx:
import { client, urlFor } from '@/lib/sanity'
import { PortableText } from '@portabletext/react'
import Image from 'next/image'
import { notFound } from 'next/navigation'

async function getPost(slug: string) {
  const query = `*[_type == "post" && slug.current == $slug][0] {
    _id,
    title,
    slug,
    mainImage,
    publishedAt,
    body
  }`
  return client.fetch(query, { slug })
}

export default async function BlogPost({
  params
}: {
  params: { slug: string }
}) {
  const post = await getPost(params.slug)

  if (!post) {
    notFound()
  }

  return (
    <article className="max-w-3xl mx-auto px-4 py-12">
      {post.mainImage && (
        <Image
          src={urlFor(post.mainImage).width(1200).height(600).url()}
          alt={post.title}
          width={1200}
          height={600}
          className="w-full rounded-lg mb-8"
        />
      )}
      <h1 className="text-4xl font-bold mb-4">{post.title}</h1>
      <time className="text-gray-500 mb-8 block">
        {new Date(post.publishedAt).toLocaleDateString('en-US', {
          year: 'numeric',
          month: 'long',
          day: 'numeric'
        })}
      </time>
      <div className="prose prose-lg max-w-none">
        <PortableText value={post.body} />
      </div>
    </article>
  )
}
Step 8: Styling with TailwindCSS
Install the typography plugin for content styling:
npm install @tailwindcss/typography
Add it to tailwind.config.ts:
import type { Config } from 'tailwindcss'

const config: Config = {
  content: [
    './src/**/*.{js,ts,jsx,tsx,mdx}',
  ],
  theme: {
    extend: {},
  },
  plugins: [
    require('@tailwindcss/typography'),
  ],
}

export default config
Step 9: Configure Next.js for Images
Add Sanity domain in next.config.js:
/** @type {import('next').NextConfig} */
const nextConfig = {
  images: {
    remotePatterns: [
      {
        protocol: 'https',
        hostname: 'cdn.sanity.io',
      },
    ],
  },
}

module.exports = nextConfig
Step 10: Run the Project
Now run the Next.js project:
npm run devOpen http://localhost:3000 and see your blog!
Conclusion
Congratulations! You’ve successfully built a blog with Next.js, TailwindCSS, and Sanity CMS. This combination is very powerful because:
- Next.js provides excellent performance and SEO
- TailwindCSS makes styling fast and consistent
- Sanity CMS provides a user-friendly dashboard for content management
Have questions? Reach out to me on Twitter @nayakayp!